The smallest.space web radio player project - completed
I’ve recently been taking steps to carve out a few AI and tech-free-ish parts of my life. Or at least trying to make them more human-forward and intentional. One of the ways I’ve been doing this is replacing Spotify with vinyl records (either bought myself or rent from the library) + discovering music through our local Grand Rapids volunteer-run WYCE radio station. I love the idea that somebody, live, and not so far my house is actively choosing what to play.
The problem with the radio thing is I’ve found it a bit difficult to find a radio that fits well into my living room setup, especially a small radio with line-out that is available cheaply. I was using an app on my phone to stream over bluetooth to my receiver. This worked well enough but I wanted something simpler that didn’t require interaction with a phone. I wanted something that represented the idea of “this always plays the radio and nothing else.” So that’s where this project came along, a device that does one thing: plays a specific web radio stream with a line-out connection for my receiver (the bonus toy internal speaker came later). I wanted the device to be small and not slide around plus look decent or at least interesting sitting next to my turntable, so I decided on a hand-made ceramic base made out of clay in my modest pottery studio in the basement.
So that’s what this project is all about. Build a device that streams audio from a web radio stream and has a 3.5mm jack for line level audio output, and make a ceramic base to display the device. This involved designing an ESP32-based electrical circuit with a custom PCB, creating an Android and iOS app to setup the device + releasing them in their respective app stores, and designing, molding, glazing, and firing a ceramic base to complete the project. The total time for this project was roughly four months, which for me is an achievement and I’m fairly proud of that time from ideation to completion.
tl;dr; aka the final output in an image

Here is a very long youtube video that is a full demo, issues and all, of the finished project (also embedded below).
History / context
- I decided to keep track of the project from inception of the idea to completion
or abandonment- the first post covering the initial idea is here - After a few months of elapsed time, I wrote another blog post with updates on the progress including PCB design, ceramic holder design, etc - that second post is here
- The third (and last) post I got the unpopulated PCBs and electrical components back, managed to successfully solder a working board, and started the slip casting mold for the ceramic holder - that post is here
- I had left the last post just starting the (long) process of creating the ceramic base, but with a working PCB.
Here is the electronic circuit design:

Here is the PCB design:

Here is the app:
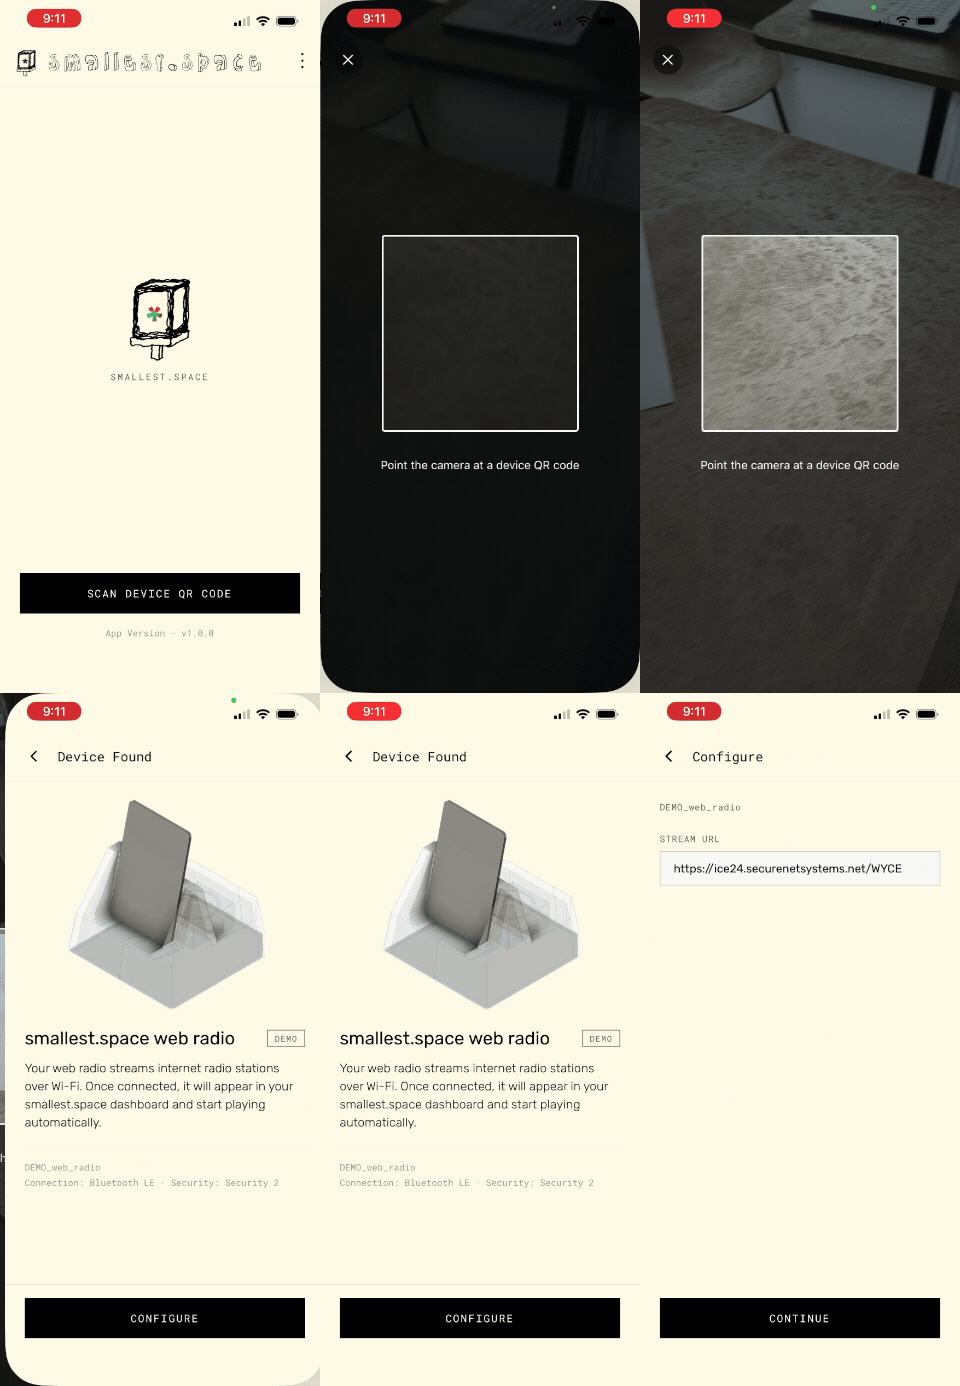
The actual PCB, final ceramic design, etc, you can see above and below.
The pottery / ceramic work
I thought creating the ceramic base for the PCB was going to be a fairly long and time intensive process from the outset of the project, and that turned out to be true. If you haven’t read the previous post, near the end I had done a messy job of pouring plaster molds for this project. Specifically I poured two molds, one that was 12.5% larger than the PCB I had originally designed, and one that was 115% larger.
The different sizes are to account for different shrinkage rates that the two clay bodies I used experience. A speckled stoneware clay (Laguna WC608 - 12.5%) and white “porcelain” (Standard 365 - 15% - the quotes around porcelain because there is some debate about if this is actually porcelain but for the purposes of this blog post, we’ll say it is from here).
The slip (liquid clay) I poured into the molds with a 500ml syringe. I don’t have a great photo of this unfortunately, but here you can see the syringe full of slip - I was measuring it to figure out it’s water content (by measuring it’s specific gravity):

Again I don’t have a great photo of slip “dwelling” in the mold (basically sitting full), but this is a photo of what the mold looks like after I pour out all of the extra slip:

After letting the slip dry in the mold for a few hours I carefully (then less carefully after the frustration of the sticking clay sets in!) shake the clay out of the mold. What follows is the most tedious and time consuming part of the process, which is VERY carefully trimming the clay down to it’s final form. This involved using the black paddle looking things on the table in the below photo to create impressions for where critical features needed to be (mounting holes for the PCB as well as the holes required for the speaker), then using a razor and hole punch tool to actually cut out and remove this excess clay. There is also extra clay to trim off from the foot, where the sprue of the mold is (the extra wide bit that acts as a reservoir to hold extra clay as the porous plaster sucks in water).
Each step in this process happens at a different point - e.g. use 3D printed marking tools as soon as clay is out of mold, wait 30 minutes. Use razor to cut off sprue, then wait 60 minutes. Use hole punch tools to remove mounting holes. etc, etc. It’s fairly tedious.

To make matters slightly worse / more tedious, both of the molds I made had some plaster break off in critical areas when I first made the plaster molds. As a result, as you can see in the below photo, I had to manually fix up certain areas of the clay after removing. The molds were not at all perfect, and if i was doing some sort of large production run of these I would almost certainly redo the design of the mold (not to mention create silicone mold-molds, so I could cast multiple bases at once - as is, I could only make a single base per mold per day).

Anyway, after 5 or so days (with a few failed attempts at trimming early on) I ended up with seven “good” pieces. I say “good” because the reality is some of these looked a bit rough. Slip casting is a bit finicky and making the slip the way I do (which is starting with regular throwing clay, letting it get bone dry, then adding water back to it with a deflocculant to make it less viscous) is a bit of a pain. The porcelain slip I made has too much water and more water means that the plaster saturates more quickly and my walls were not thick enough to give good stability. The porcelain has little/no grog (larger particles in the clay that help to give some stability during firing) so the porcelain tends to warp a lot more in the kiln even under it’s own weight.

After letting the clay dry out fully for a week or so, I did the initial bisque firing (cone 04), which is a lower temperature firing that results in the clay turning into hardened ceramic, but not yet fully vitrified (melted). The clay is still porous which helps the glaze suck up against the pieces. This is right after opening the kiln after the bisque firing:

Next came the glazing. To be honest this is one of my worst parts of pottery because I generally find it tedious, but it’s also very important to do well because you don’t want to ruin all of the work in the very final stage. This photo gives you an idea of what is involved in the glazing process. I wanted to dip the pieces in glaze (my normal process, less tedious than painting IMHO!) and I wanted only the outside of the bases covered in glaze, which mean I had to use tape to (try) to plug all of the holes so that when I dripped the piece in the glaze they didn’t flood on the inside:

Generally this actually worked surprisingly well given the inside surface is pretty rough / uneven and not a great surface for painters tape to make a water tight seal… but it certainly didn’t work perfectly. You can see here what happened in 3 of the 7 pieces, the glaze made it through the tape requiring manual cleanup:

After eac piece is dipped I had to go back through with a tool to clean out the various mounting holes because the glaze tends to collect / pool in tight radiuses (I expected this and oversized the holes, but still had to manually clean each hole up a bit). You can see in this photo that some of the holes nearly completely closed up:

Here are all of the pieces (along with some other stuff) in the kiln ready for the final glaze firing (note four of them are in lower shelves):

After taking out of the kiln I was not quite done, each piece had to be sanded down (first on my wheel with a diamond bat the get the base smooth, then with a hand diamond file to get the edges smooth):

But then finally, I was done with the bases:


Final thoughts, what’s next, etc
So, first of all, here is a full walk through of the device including setup, switching modes, resetting, etc. It’s pretty long to be honest, but if you’re curious:
You can also read more about the device / setup / options on the smallest.space web radio device page.
Overall I’d say I’m really pleased with the results of the project. To be honest there are a number of things that are not perfect, but I managed to completely the entire project almost entirely without having to do any rework. A lot of this had to do with luck to be fair, but I like to think some of my success on the first try came from the fact that I’ve done enough similar projects in the past that I’ve learned something and am just better / faster than I was, say, ten years ago.
For whatever it’s worth, I would say this project was difficult. I can’t really say how much time I spent in total, but ball park I’d say roughly 100 hours of work minimum. Taking out all of the R&D time (e.g. designing circuit, designing PCB, designing mold, making mold, etc) I’d say each individual complete item took around 4-8 hours to make (1-2 hours to populate and test each PCB, 3-6 hours to cast, trim, glaze, and sand each base). I thought about this project most days of the past 4 months, and fitting in a true 100+ solid hours in four months along with work and everything else in life was a bit mentally exhausting.
Things I’d change
If I did this project again (or if I made a new version of it, which is possible) I’d probably consider:
- Make more buttons on the PCB so that there were dedicated buttons for different tasks (e.g. swapping audio output mode)
- Consider splitting controls out from the main PCB to make it slightly more pleasant to press the buttons
- As a random stretch goal, perhaps use something like cherry keyboard switches for the buttons, and have a basic synth built into the project, maybe you could swap between web radio streaming and a very simple synth mode or something
- I might add a few more status lights or other ways to be able to easily see the device state
- The power slide toggle is tiny and annoying. I actually ave a bunch of nicer toggle switches I had considered using instead, but mechanically they are a bit bigger and I was worried it might make the design look even more awkward.
- Iterate on the ceramic base design a bit more, make something more interesting to look at and easier to make
That’s it for this one, for now
So that’s about it. I’m happy to call this project “done” so I can clear out headspace for other projects, and I’m relieved to be able to add an item to the “projects I’ve actually finished” list.
One small thing I’ll add is that although originally I came up with this project as described in my original blog post, I also had the help of a bit of external motivation as I ran a silly competition at the co-working space I work out of, and as luck would have it the winner of the silly competition is into local public radio. So along with my own web radio I now I have sitting next ot my record player so I can listen to my local WYCE web radio stream anytime I want, I also gave one of the devices to Nicole along with this little card:

(in case you can’t tell and were curious, the competition was for somebody to come up with the best method of mixing in little carbonated water flavoring packets without the carbonated water causing the packet’s granules to get stuck to the side of the glass)
It is a silly little thing, but is in the spirit fo my “smallest.space” project which is why I decided to gently brand it with the smallest.space name.
Thanks for reading / following along!